| Description: |
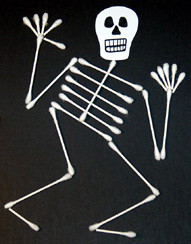
Make a skeleton out of Q-tips on a piece of paper. |
| Party Theme: |
Halloween |
| Type of Project: |
Arts & Crafts |
| Materials Needed: |
- 1 paper (black or orange)
- Glue stick
- Individual Baggie filled with 15 full Q-Tips, 2 half Q-Tips for the feet, 10 just the tip of the Q-Tips, 1 pre cut out small skeleton head (white paper)
- Thin black marker (only if the kids are making the skeleton face themselves)
- Scissors (only if the kids are old enough to cut out the skeleton head and/or cut the Q-Tips)
- Something to use to write name on project
|
| Step by Step Instructions: |
- Draw 6 horizontal lines with the glue stick for the ribs (keep them close together in the center of the page)
- Place the 6 Q-Tips on the glue lines and push down
- Dab glue on the middle of each of the 6 ribs
- Place one Q-Tip vertically on the 6 ribs
- Draw the glue lines for one arm (2 full Q-Tips) and the 5 fingers
- Place the Q-tips for the one arm and 5 fingers and push down
- Repeat steps 6 & 7 for the other arm
- Repeat steps 6 & 7 for one leg and one foot
- Repeat steps 6 & 7 for the other leg and foot
- Use a thin black marker to make a face on the head and then glue on the head (you can cut out the heads ahead of time, or have the kids do it)
- Write name on project.
|
| Additional Comments: |
Ahead of time we cut the Q-tips to the correct size and used a tracer to make all the heads the same size (cut out of plain white paper). We also drew the faces on the skeletons ahead of time. All of this was put into a baggie so the kids each had what they needed. A sample was created so they could copy the idea. The kids said they were excited to hang this project on their front door. |